
1. Outline the web page construction
We’ll create the structure of our web page utilizing HTML after which assign a typical class title to the weather we wish to animate on scroll with JavaScript. This class title is what we’ll be focusing on in JavaScript.
Within the demo above, the weather have been assigned the category title js-scroll so the HTML seems one thing like this:
1 |
|
2 |
|
3 |
|
4 |
|
5 |
|
6 |
|
7 |
|
8 |
This animation fades in from the highest. |
9 |
|
10 |
|
2. Styling with CSS
CSS does a variety of the heavy-lifting because it determines the type of animation of every component. For this CSS animation on scroll, we’ll be making a scroll animation with the category title scrolled.
That is an instance of a easy fade-in JavaScript animation:
1 |
.js-scroll doc.documentElement.clientHeight) |
6 |
);
|
7 |
|
5 |
|
6 |
.js-scroll.scrolled
|
With this code, any js-scroll component on the web page is hidden with an opacity of 0 till the category title scrolled is utilized to it.
3. Focusing on components with JavaScript
As soon as now we have our structure and types, we’re going to create the JavaScript features to assign the category title to the weather after they scroll into view. We’re additionally going to fade out the weather in JavaScript as an alternative of CSS, as we wish the weather to be seen within the occasion a browser doesn’t have JavaScript enabled.
We’ll break down the logic like this:
- Get all
js-scrollcomponents on the web page - Fade out components
- Detect when the component is throughout the viewport
- Assign the
scrolledclass title to the component whether it is in view.
Goal components on the web page
We’ll goal all of the js-scroll components on the web page utilizing the doc.querySelectorAll() methodology. It ought to appear to be this:
1 |
const scrollElements = doc.querySelectorAll(".js-scroll"); |
Fade out components
First, we have to take away the opacity:0 for .js-scroll in our CSS animation on scroll. Then we embrace this line in our JavaScript:
1 |
scrollElements.forEach((el) => |
2 |
const elementTop = el.getBoundingClientRect().prime; |
3 |
|
4 |
return ( |
5 |
elementTop <= |
6 |
((window.innerHeight ) |
This enables the weather to have their default styling if JavaScript is disabled within the browser.
Detecting when a component is in view
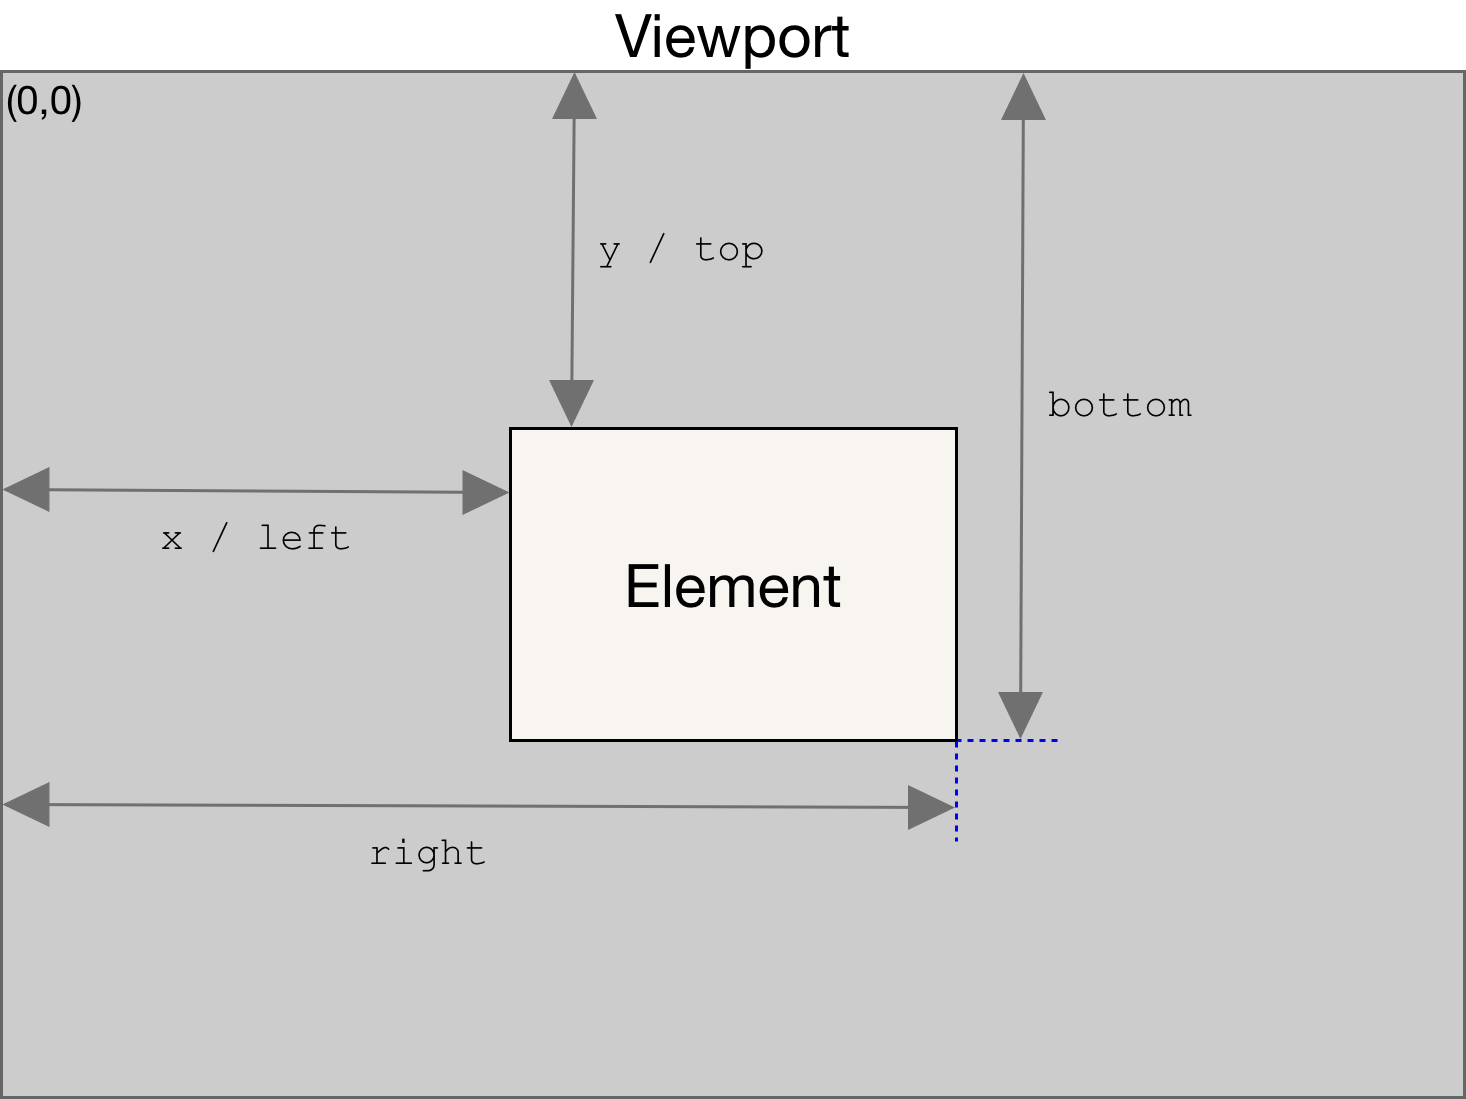
We will detect when a component is in view of the consumer by figuring out if the gap of the component from the highest of the web page is lower than the peak of the seen a part of the web page.
In JavaScript, we use the getBoundingClientRect().prime methodology to get a component’s distance from the highest of the web page, and window.innerHeight or doc.documentElement.clientHeight to get the peak of the viewport.
We’ll create an elementInView operate utilizing the above logic:
1 |
const elementInView = (el) => doc.documentElement.clientHeight) - offset) |
11 |
);
|
12 |
;
|
We will modify this operate to detect when the component has scrolled x pixels into the web page, or detect when a share of the web page has been scrolled.
1 |
const elementInView = (el, scrollOffset = 0) => ; |
On this case, the operate returns true if the component has scrolled by the scrollOffset quantity into the web page. Modifying the logic offers us a distinct operate for focusing on components primarily based on share scroll.
1 |
const elementInView = (el, percentageScroll = 100) => doc.documentElement.clientHeight) * (percentageScroll/100)) |
7 |
);
|
8 |
;
|
An added good thing about a customized implementation is that we will outline the logic to swimsuit our particular wants.
Assign class title to component
Now that we’re in a position to detect if our component has scrolled into the web page, we’ll have to outline a operate to deal with displaying the component–on this case we’re displaying the component by assigning the scrolled class title.
1 |
const displayScrollElement = (component) => ; |
We’ll then mix our logic with the show operate and use the forEach methodology to name the operate on all js-scroll components.
1 |
const handleScrollAnimation = () => { |
2 |
scrollElements.forEach((el) => |
6 |
const elementTop = el.getBoundingClientRect().prime; |
7 |
|
8 |
return ( |
9 |
elementTop <= |
10 |
((window.innerHeight ) |
7 |
}
|
An elective characteristic is to reset the component to its default state when it’s not in view. We will try this by defining a hideScrollElement operate and together with it in an else assertion to our above operate:
1 |
const hideScrollElement = (component) => { |
2 |
component.classList.take away("scrolled"); |
3 |
};
|
4 |
|
5 |
const handleScrollAnimation = () => { |
6 |
scrollElements.forEach((el) => { |
7 |
if (elementInView(el, 100)) { |
8 |
displayScrollElement(el); |
9 |
} else { |
10 |
hideScrollElement(el); |
11 |
}
|
12 |
})
|
13 |
}
|
Lastly, we’ll move the above methodology right into a scroll occasion listener on the window so it runs every time the consumer scrolls.
1 |
window.addEventListener('scroll', () => { |
2 |
handleScrollAnimation(); |
3 |
})
|
And voilà, we’ve applied all of the features we have to animate on scroll with JavaScript.
We will see how the logic works on this demo:
The whole code seems like this. JavaScript:
1 |
const scrollOffset = 100; |
2 |
|
3 |
const scrollElement = doc.querySelector(".js-scroll"); |
4 |
|
5 |
const elementInView = (el, offset = 0) => doc.documentElement.clientHeight) - offset) |
11 |
);
|
12 |
;
|
13 |
|
14 |
const displayScrollElement = () => { |
15 |
scrollElement.classList.add('scrolled'); |
16 |
}
|
17 |
|
18 |
const hideScrollElement = () => { |
19 |
scrollElement.classList.take away('scrolled'); |
20 |
}
|
21 |
|
22 |
const handleScrollAnimation = () => { |
23 |
if (elementInView(scrollElement, scrollOffset)) { |
24 |
displayScrollElement(); |
25 |
} else { |
26 |
hideScrollElement(); |
27 |
}
|
28 |
}
|
29 |
|
30 |
window.addEventListener('scroll', () => { |
31 |
handleScrollAnimation(); |
32 |
})
|
CSS:
1 |
.js-scroll { |
2 |
width: 50%; |
3 |
peak: 300px; |
4 |
background-color: #DADADA; |
5 |
transition: background-color 500ms; |
6 |
}
|
7 |
|
8 |
.js-scroll.scrolled { |
9 |
background-color: aquamarine; |
10 |
}
|
4. Extra animations with CSS
Let’s check out the primary demo once more:
We see that the weather seem with completely different JavaScript animations. This was achieved by assigning completely different CSS animations to class names. The HTML for this demo seems like this:
1 |
|
2 |
|
3 |
|
4 |
|
5 |
This animation fades in. |
6 |
|
7 |
|
8 |
|
9 |
|
10 |
|
11 |
|
12 |
This animation slides in to the highest. |
13 |
|
14 |
|
15 |
|
16 |
|
17 |
|
18 |
|
19 |
This animation slides in from the left. |
20 |
|
21 |
|
22 |
|
23 |
|
24 |
|
25 |
|
26 |
This animation slides in from the suitable. |
27 |
|
28 |
|
The lessons subsequent to the js-scroll class are what we goal in CSS to deal with the completely different animations. In our CSS stylesheet, we’ll have:
1 |
.scrolled.fade-in { |
2 |
animation: fade-in 1s ease-in-out each; |
3 |
}
|
4 |
|
5 |
.scrolled.fade-in-bottom { |
6 |
animation: fade-in-bottom 1s ease-in-out each; |
7 |
}
|
8 |
|
9 |
.scrolled.slide-left { |
10 |
animation: slide-in-left 1s ease-in-out each; |
11 |
}
|
12 |
|
13 |
.scrolled.slide-right { |
14 |
animation: slide-in-right 1s ease-in-out each; |
15 |
}
|
16 |
|
17 |
@keyframes slide-in-left { |
18 |
0% { |
19 |
remodel: translateX(-100px); |
20 |
opacity: 0; |
21 |
}
|
22 |
100% { |
23 |
remodel: translateX(0); |
24 |
opacity: 1; |
25 |
}
|
26 |
}
|
27 |
|
28 |
@keyframes slide-in-right { |
29 |
0% { |
30 |
remodel: translateX(100px); |
31 |
opacity: 0; |
32 |
}
|
33 |
100% { |
34 |
remodel: translateX(0); |
35 |
opacity: 1; |
36 |
}
|
37 |
}
|
38 |
|
39 |
@keyframes fade-in-bottom { |
40 |
0% { |
41 |
remodel: translateY(50px); |
42 |
opacity: 0; |
43 |
}
|
44 |
100% { |
45 |
remodel: translateY(0); |
46 |
opacity: 1; |
47 |
}
|
48 |
}
|
49 |
|
50 |
@keyframes fade-in { |
51 |
0% { |
52 |
opacity: 0; |
53 |
}
|
54 |
100% { |
55 |
opacity: 1; |
56 |
}
|
57 |
}
|
We don’t have to make any adjustments to the JavaScript code for the reason that logic stays the identical. This implies we will have any variety of completely different animations on a web page with out writing new features.
5. Growing efficiency with throttle
Every time we embrace a operate in a scroll listener, that operate known as each time the consumer scrolls the web page. Scrolling a web page of 500px may cause a operate to be known as not less than 50 occasions. If we’re making an attempt to incorporate a variety of components on the web page, this could trigger our web page to decelerate considerably.
Throttle operate to the rescue!
We will cut back the variety of occasions a operate known as by utilizing a “throttle operate”. A JavaScript throttle operate is a better order operate that calls the operate handed into it solely as soon as throughout a specified time interval.
It’s particularly helpful with scrolling occasions as we don’t have to detect each pixel scrolled by the consumer. For instance, if now we have a throttle operate with a timer of 100ms, the operate will solely be known as as soon as for each 100ms the consumer scrolls.
A JavaScript throttle operate could be applied like this:
1 |
//initialize throttleTimer as false
|
2 |
let throttleTimer = false; |
3 |
|
4 |
const throttle = (callback, time) => { |
5 |
//do not run the operate whereas throttle timer is true
|
6 |
if (throttleTimer) return; |
7 |
|
8 |
//first set throttle timer to true so the operate does not run
|
9 |
throttleTimer = true; |
10 |
|
11 |
setTimeout(() => { |
12 |
//name the callback operate within the setTimeout and set the throttle timer to false after the indicated time has handed
|
13 |
callback(); |
14 |
throttleTimer = false; |
15 |
}, time); |
16 |
}
|
We will modify our window on scroll occasion listener to appear to be this
1 |
window.addEventListener('scroll', () => {
|
2 |
throttle(handleScrollAnimation, 250); |
3 |
}) |
Now our handleScrollAnimation operate known as each 250ms whereas the consumer is scrolling.
Right here’s what the up to date demo seems like:
6. Enhancing accessibility
Efficiency isn’t the one requirement when implementing a customized characteristic; we additionally have to design for accessibility. Designing for accessibility means taking customers’ decisions and circumstances into consideration. Some customers could not wish to have animations in any respect, so we have to account for that.
The lowered movement media question
We will try this with the prefers-reduced-motion question and a JavaScript implementation.
“prefers-reduced-motion […] is used to detect if the consumer has requested that the system reduce the quantity of non-essential movement it makes use of” – MDN
Modifying our code above, the question would appear to be this on this CSS animation on scroll:
1 |
@media (prefers-reduced-motion) { |
2 |
.js-scroll { |
3 |
opacity: 1; |
4 |
}
|
5 |
.scrolled { |
6 |
animation: none !essential; |
7 |
}
|
8 |
}
|
With these strains of code, we make sure that the animated components are at all times seen and the animation is turned off for all components.
The prefers-reduced-motion question isn’t absolutely supported throughout all browsers so we will embrace a JavaScript fallback:
1 |
const mediaQuery = window.matchMedia("(prefers-reduced-motion: cut back)"); |
2 |
|
3 |
window.addEventListener("scroll", () => { |
4 |
//test if mediaQuery exists and if the worth for mediaQuery doesn't match 'cut back', return the scrollAnimation.
|
5 |
if (mediaQuery && !mediaQuery.matches) { |
6 |
handleScrollAnimation() |
7 |
}
|
8 |
});
|
This manner, if the consumer prefers lowered movement, the handleScrollAnimation operate is rarely known as in any respect.
Have you ever at all times wished to study on scroll animation? Nicely, there you go! We now have a extremely performant, absolutely accessible implementation of the “animate on scroll” characteristic that works throughout all browsers!
Leave a Reply